Showing posts with label shirts. Show all posts

Sunday, June 10, 2018

Maternity Sewing

At the beginning of my pregnancy (and before I got pregnant) I had grand visions of all of the maternity clothes I was going to sew for myself - Megan Nielsen's maternity patterns, clothes from the DIY Maternity blog, and other things I'd seen on the internet.  In the end, even though my pregnancy was for the most part easy and super-smooth, I was really tired and I didn't have the energy or the time to sew much of anything.

I ended up sewing one thing from scratch (the Cordelia maternity camisole from So, Zo) and re-making one thing (a pair of black maternity slacks from a pair of regular non-maternity pants).  These pictures were taken at about 34 or 35 weeks of pregnancy.
For the pants, I referred to a few tutorials on the internet, but mostly modeled them off of a pair of maternity jeans I bought at Goodwill.  The jeans had a wide elastic waistband in a knit casing that felt like cotton spandex.  I used about a yard of 2-inch elastic that I already had on hand and some black 90% cotton/10% spandex knit that I got at JoAnn.  I bought a pair of Banana Republic stretch wool pants from ThredUp (the same brand and a similar style to the three pairs of pants I've been wearing to work for the past few years) two sizes larger than I usually wear.

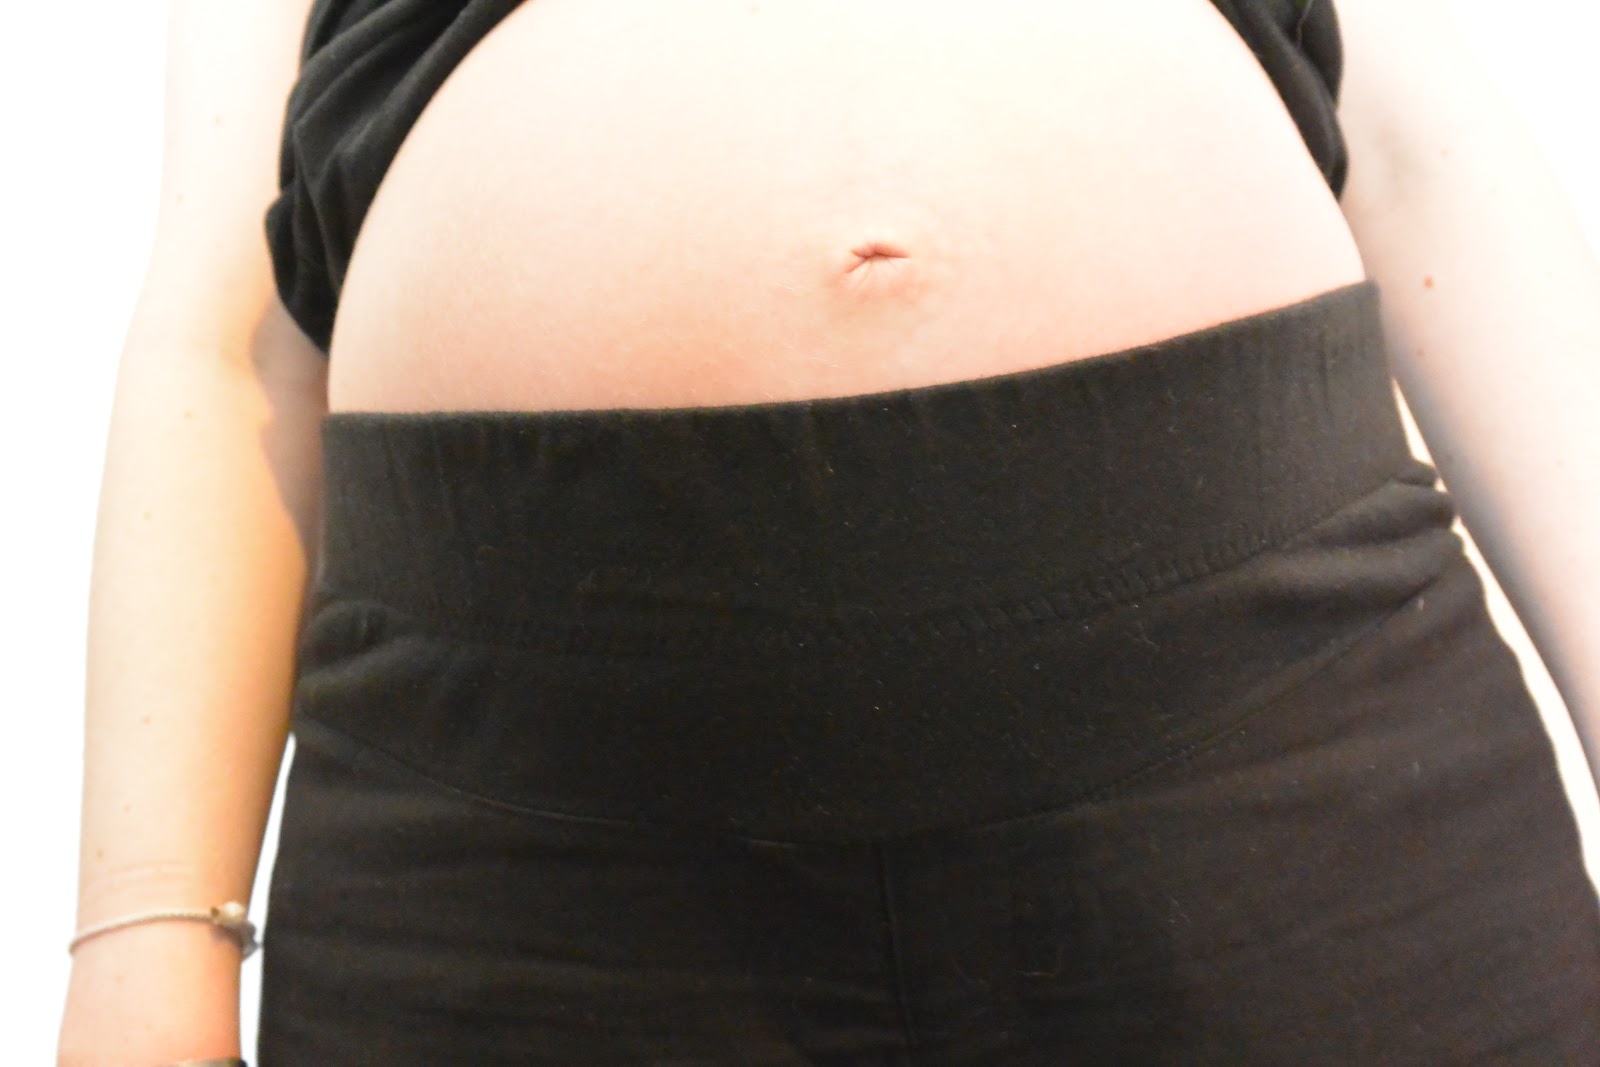
I picked out the zipper and removed the waistband of the pants, and then I marked out and stitched along a curve in front that would fit under my belly.  I topstitched down what remained of the fly.  Then I cut a piece of jersey about 9 inches long and the width of the new waist opening of the pants and serged it into a tube.  I checked the length of the elastic around my belly and sewed the ends together (overlapping them about an inch).  Then I folded the new waistband in half, right sides out, and slipped in the elastic, then zig-zagged along the lower edge of the elastic, through all 3 layers, to hold it in place and keep it from twisting later.  I serged the new waistband to the pants opening, pressed the seam allowance toward the pants, and finished by topstitching to stabilize the pants and hold the seam allowance in place.

Then I wore the pants two or three times a week until the end of the semester.  For most of my pregnancy, wide elastic waistbands like the one on these pants were more comfortable for me than the full belly panels.  But for the last few weeks, my belly was big enough that it was pushing these waistbands down, and I found the full panels more comfortable.  Luckily, that change happened right about at the end of the semester, at the same time that a church friend who had her baby lent me several pairs of full panel jeans, so because I no longer needed to dress up to teach, I could just wear those most of the time.

The camisole was another piece that I wore all the time - I had a few sweaters that I wore with this underneath.  I made a straight size 14, and the construction was pretty quick and straightforward.  I was a little nervous about the foldover elastic, but this tutorial was helpful, and in the end it wasn't too bad.  I used cheap foldover elastic from JoAnn, and it hasn't washed and worn as well as you'd hope.  Next time, I would order higher quality elastic online. 

I really like this pattern.  The camisole was really comfortable - I like the wide bottom hem band, and there was plenty of room for my belly to be comfortable until the very end of my pregnancy. 

Saturday, November 11, 2017

Sheepie Shirt!

Last spring I found this adorable sheep-print quilting cotton at my local quilt shop and bought a yard with no plan.  I ended up ordering a yard of solid navy blue Robert Kaufman Cambridge Cotton Lawn to go with it and made a heavily modified version of McCall's 7285, which I made without modifications last spring/early summer.

This time, I shortened the sleeves significantly and made extensive changes to the back:
I split the back pattern piece horizontally about halfway down the armscye, and cut 2 of the yoke piece on the fold, so I could do a double-layer yoke construction with all of the yoke seam allowances enclosed.  I cut the main back piece on the fold, too, and but put the center back line about 2" away from the fold, adding several inches of space in the back.  I added some notches on the yoke and main back piece, so I could keep track of where I wanted the gathers to bunch in the center.  Then, because I no longer had a button in the back, I finished the neckline with a narrow bias facing.  I cut a 10' square and turned it into continuous bias tape using instructions from an old quilt book, and then applied the bias facing using this Craftsy tutorial.

In general, I'm much happier with this version than I am with the first.  The sleeves are more comfortable at the shorter length, and I can move more easily (although I still think the fit in the upper back could be better, as evidenced by the drag lines toward my armpits in the photo of the back of the shirt).  Most importantly, though, it doesn't have a button at the back neck!  The neckline is wide enough to go over my head comfortably, and I've found that the button on the first version catches in my braid in a terrible way, so I can't wear that shirt on days when I want to braid my hair. 

I've already started making a third version of this shirt, in a lovely floral Liberty lawn.  It's a long-sleeved version, with pintucks down the front.  The only fit change I'm attempting from this one to that one is to try to eliminate a little bit of gaping at the front neckline.  I'm excited to see how it fits when it's done!

Tuesday, August 15, 2017

Little Polo Shirts

My nephew and grandcousin (first cousin once removed) have birthdays two weeks apart, and they turned two at the beginning of the summer.  By luck, we were visiting my family in Europe for my grandcousin's birthday, and we were able to attend his birthday party.

I made two identical little polo shirts for little boy second birthday gifts.  They're size 2T Oliver + S Parachute Polos.  They went together pretty smoothly and I was happy with how they turned out, but I don't quite like this pattern as much as I like the Sketchbook Shirt.  Part of it was that I fought with my machine hemming the knits.  I ended up using a twin needle on the sleeve hems and a triple stretch stitch on the shirt hems, and wasn't 100% happy with either one.
I also think the inside of the side vent could be a little cleaner.
I did like how the inside of the collar and plackets looked, though.

Thursday, July 27, 2017

A shirt for me!

In service of my goal to make some shirts for myself, I tried out a woven t-shirt pattern: McCall's M7285.  I made it out of a quilting cotton I got at the Hancock's going out of business sale last summer, and I'm thinking of it as a nice wearable muslin.  I was able to cut this and the Roller Skate dress I made for my cousin's daughter out of a 2-yard cut of fabric.
I measured the bust of an old sleeveless blouse with a similar fit and closure and then cut a straight size 10 using the A/B cup front pattern piece.  It's a little snug in the hips, even though I narrowed the seam allowances by 1/4" at the bottom of each side.  The back is also a little tight across the shoulders.
The bust darts are in the right place, but as you can see in the next picture, after I lift my arms I get a fold of fabric stuck above my bust.  I'm not sure whether that has to do with the non-drapiness of the quilting cotton, or because I made a size that is too small, or what.
It's not very visible in the pictures, but I'm also getting a little bit of gaping at the front neckline.

Even though it's not perfect, I'm planning to make at least two more of these, and I have some ideas for what I'm going to change:

  • lowering the front neckline by about an inch and eliminating the button closure at the back neck.  I don't need the button to get this one over my head, and when I wear my hair in a braid it gets knotted around the button, which is no fun.
  • adding a back yoke.  I'll make the seam between the yoke and the back piece about half-way down the armscyes, and put some gathers in the center of the back piece.   This should give me some extra room at the back shoulders, so I can move more easily.  I'm also hoping it will fix the fabric getting stuck above my bust problem.  I'll cut both the back and back yoke pieces on the fold.
  • shortening the sleeves by at least two inches.
I'm excited for the next version, but in the meantime I've been wearing this one a lot!

Sunday, March 12, 2017

Another Sketchbook Shirt

This was a Christmas gift for my nephew, who was 18 months old at the time.  It is another Oliver + S sketchbook shirt.  The first two were short-sleeved, size 12-18 months, and the second one had a 1/4 inch broad shoulder adjustment.  This one is a long-sleeved 2T with the same broad shoulder adjustment.
I was looking for a nice plaid flannel, but the fabric I ended up finding at my local quilt shop was more like a homespun kind of thing than a true flannel.  I did all french seams, including the armscyes, and cut the yokes and pocket on the bias.  I used this tutorial from Really Handmade to figure out the plaid-matching at the plackets and side seams.  I think it turned out really well!

Friday, September 9, 2016

Paddington Bear

Early this summer, my sister-in-law and I went and shopped the Hancock's Fabrics closing sale.  She found an adorable Paddington Bear print and asked me to sew another button-up shirt for my nephew, like the one I made for his birthday.  I asked about sizing, and she suggested that a little more room in the shoulders would be nice, so I got to try my first attempt at altering a pattern!  I added a quarter inch to each shoulder seam, as you can see in the picture above, for a total of half an inch of extra width across the shoulders.
Then I sewed up the shirt, just like the last one - except this time I remembered to use Nicole's trick of cutting the collar interfacing into two pieces to make the collar fold extra nicely.

I put the shirt in the mail last weekend, and this morning my sister-in-law sent me a picture of my nephew looking very handsome in his new shirt!

Sunday, June 19, 2016

Birthday shirt

My nephew just had his first birthday.  I wanted to make him something to wear, like I've done for his sister for each of her birthdays.  I chose the Oliver + S sketchbook shirt.  I made the 12-18 months size and it fit him - I hear he's already worn it twice!
The only modification I made to the pattern was to use snaps instead of buttons.  I figured that snaps are easier for me to put in than buttons and buttonholes, and are also easier for his parents to fasten and unfasten when they're dressing him.
I felt like a sewing rockstar when I put in the collar - I followed the instructions in the pattern, including hand basting the collar to the shirt rather than pinning, and it went very smoothly.  Next time, I will use Nicole's trick of cutting the interfacing for the collar to make it fold more nicely.  I also love the little box pleat in the back.
I think I will be making this one again as my nephew gets bigger.  And it was a great way to dip my feet into shirt sewing.  I plan to work my way up to shirtdresses and men's and women's dress shirts!

Thursday, March 10, 2016

Friday Night Sew-In

I sewed myself a shirt Friday night (actually I finished it Saturday afternoon, but most of the work was done Friday night).  It's the Seamwork Akita.  The pattern claims that it can be sewn up in one hour, which was not my experience at all, but then I'm a pretty slow and somewhat inexperienced sewist.  It took me one hour just to tape and cut out the pattern piece, plus probably a good 3 hours of sewing.
And then when I was done, I discovered that it doesn't fit correctly.  At all.  If you look closely at this picture, you can see that the dart is way too low:
I really like the fabric, though, and in general I like the style.  It's pretty comfortable, and was definitely easy to sew (except that my fabric wouldn't take a crease, which made it a bit harder, but still).  If I can move the dart so it fits me I can see myself making a bunch of these.

I told my mom I would let her have this shirt if it fits her and she likes it, but I think instead I might try cutting it up to make a different shirt.  One thing about it that was definitely a success (but you can't see it in the pictures) is that I finished the neckline with metallic gold bias tape.

Pattern: Seamwork Akita
Size: 8, no modifications
Fabric: a mystery synthetic print handed down via my husband's grandmother and my sister-in-law

Sunday, June 28, 2015

Sailboat top

I made my niece (who is 21 months) this little top for summer.  It's the Geranium tunic from Made by Rae.  I cut the 18-24 months width but lengthened the bodice by 1/2" and cut the "skirt" about half an inch longer than the 3T length.  Then I put a tuck in the hem, which took out about 1.25" of length, so it can easily be lengthened as she grows.  My niece is tall and skinny.  I think it might even still fit her next spring and summer, so I hope the extra length in the tuck will come in handy.
The pattern directions say to zig-zag over the exposed edge of the flutter sleeve, but I decided to serge it with red thread instead - I don't have much confidence in my ability to zig-zag the edge of the fabric accurately.  I decided that as long as it was going to be visible it might as well be a design element (and luckily my serger was threaded with red thread when I got it, so red and white are the only colors of thread I have for it).  I think the red thread goes nicely with the sailboat fabric.

Sunday, June 1, 2014

Shirt refashion

 Yesterday I did some mending and refashioned a top that I bought several weeks ago on ThredUp.  I thought the fabric and styling were really cute (and the price was right, and it doesn't have the environmental or human impact of a new piece of clothing!) but it was too big. 
Here are the before pictures, front and back.  It was really baggy and the neckline was shifting and gaping all over the place.  I thought about taking in the sides, but it's a woven (non-stretch) pullover style, so I was worried about still being able to get it on and off, and it has pockets and a bottom hem band that I didn't want to mess with.  I would have probably also needed to take in the shoulders to raise the neckline, and I was afraid to mess with the tulip sleeves.


 Instead I decided to take the easy way out and put in an elastic casing in the back.  This idea was inspired by the Washi dress and Josephine top by Made by Rae.  I pinned in a makeshift casing on the outside to audition elastic length and location - you can see that in the top photo.  Then I cut a piece of white fabric to 1.25" by the width of the shirt back plus one inch (21" in this case), pressed the edges under, and stitched it to the inside of the shirt back, just under the armscyes. Here is the after.  It is still kind of baggy - there's no way to change the style of the shirt, and that's okay with me.  But I no longer feel like I'm swimming in it, and the neckline stays in one place now, close to my chest.  Robert says it even almost looks like it's supposed to be this way, so I'm counting it as a success!


I'm not counting this as a start or a finish in my running counts.