In the six years I lived in Texas, I knit a lot of socks and almost never wore them. When we moved to the Midwest a year and a half ago, I had about 20 pairs of handknit socks, and each of them had only been worn a few times. Since then, they've all been worn a lot - and I have new opinions about them. I'm finding that I like my socks to fit with some negative ease, and to be knit at a tight gauge. I like them to have some structure, so they don't twist around or slide down in my shoes (this problem is worse with boots, which I now own two pairs of (previously, I owned zero)). In general, I prefer a traditional, top-down heel-flap heel to almost all of the toe-up/short-row heels I've tried.
With this new knowledge, this Fall I fixed some of the socks in my drawer, to make them more wearable:
This pair, my Deflect socks, were just too long in the foot. I had knit them long because the cable pattern has a very long repeat, and I convinced myself that it would be okay, but once I started wearing them often they were not okay. I had at least an inch of extra length beyond my big toe. So I ripped out the toe half of the feet and re-knit them significantly shorter. Now I enjoy wearing them!
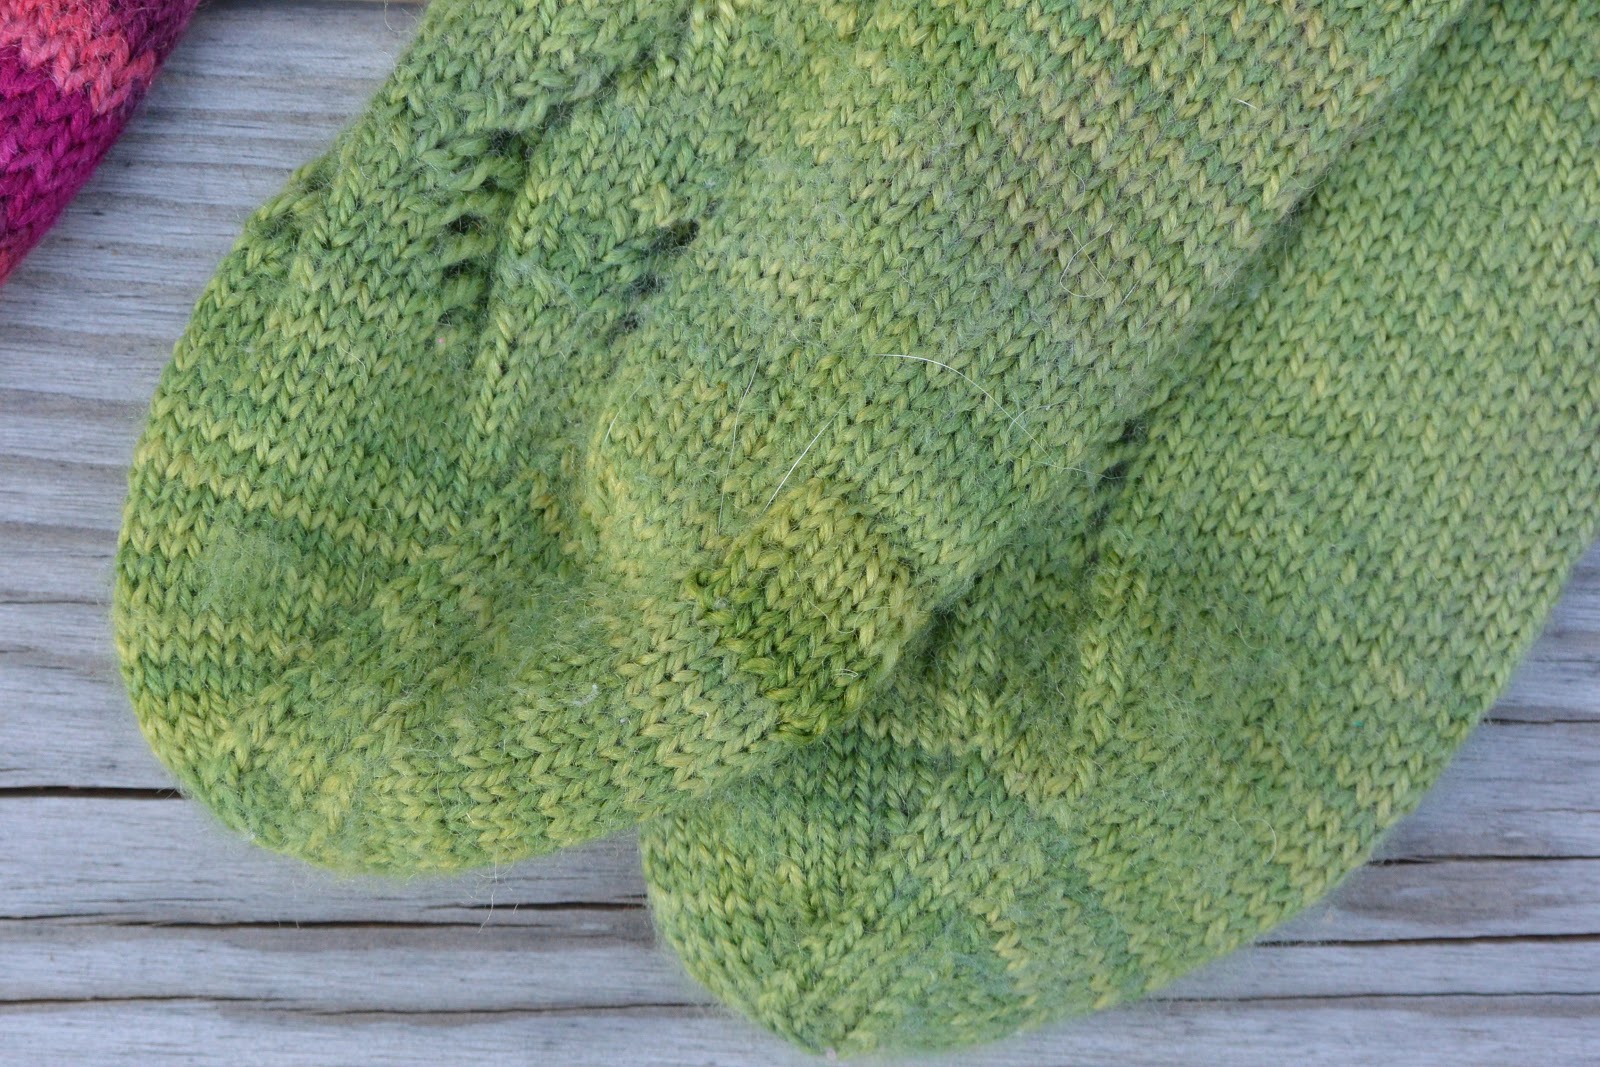
The green pair (which I apparently made before I started the blog) fit well, and I enjoyed wearing them, but I made them in a very soft yarn. I wish I had knit them at a tighter gauge - I think they would have worn better. As it was, wearing them often for a year, I wore a hole under the ball of the foot of one sock. Luckily, I still had the extra yarn, so I was able to repair the hole with a knit-in-place patch, following this tutorial. I was somewhat surprised to see how much these socks have faded from wear - the color difference is pretty clear in the photo! I was mildly concerned that I would be able to feel the patch when I wore the repaired sock, but it hasn't bothered me at all. I'm glad that I can wear one of my favorite pairs of socks again.
The last pair are my Skew socks, which I knitted while I was on the job market in Winter and Spring 2016. They were too big, especially in terms of length in the foot. Unfortunately, because of the unusual toe-up way these socks are constructed, I couldn't just re-knit the toes, like I did on the red pair. Instead, I frogged the whole pair and re-knit them with the same yarn, but on smaller needles. It was a little bit time-consuming, but totally worth it. I love the way these socks fit! They have a right and left foot, so they fit snugly in the toes across both feet, and the way the heels are constructed, they don't shift around in my boots at all. They are a little firm to get on and off, but once on they're really comfortable. This is the only construction I've used so far that I actually prefer to top-down heel-flaps. I will definitely be making more of these - maybe I'll try to embellish them with some cables of lace, since the pattern is pretty plain.
Tuesday, December 26, 2017
Saturday, December 23, 2017
Deep in the Forest Shawl
I started this shawl in May 2016, right around the time I graduated, and I finished it sometime during the 2016-2017 academic year - I was pretty behind on blocking it (sometime this fall), and I'm even further behind on blogging it.
The pattern is the Lost in the Forest shawl. I enjoyed knitting it, especially once I got to the leaf lace pattern (the inner border). The first long lace section wasn't very interesting. I used some of the navy blue laceweight that I used for another shawl in 2015, and I still have enough left for another small shawl. This shawl is joining the first navy one in the future gift pile.
Pattern: Lost in the Forest shawl by Cath Ward
Size: one size
Yarn: Lanna Gatto Harmony 2/30 in Captain Navy, 40g of a 100g skein (29g remaining)
Needles: US3 (3.25mm)
Started/Completed: May 2016/sometime in 2017
Modifications: none
Friday, November 24, 2017
Swan Lake dress
My niece turned four in September, and I made her a Swan Lake dress. She is really into dance and ballet right now. It's a flutter sleeve Geranium in size 4T (if I remember correctly), with some length and width adjustments to the skirt in order to take full advantage of the border print fabric.
I used some digitally printed fabric from Hawthorne Threads, and to be honest I didn't love it. It was pretty stiff, and the ink was very dense on the surface of the fabric. I don't think I would use this fabric for quilting, and it would definitely not be appropriate for any application that needs to drape. But the prints were adorable. I hope it will hold up okay with frequent washing.
Saturday, November 11, 2017
Sheepie Shirt!
Last spring I found this adorable sheep-print quilting cotton at my local quilt shop and bought a yard with no plan. I ended up ordering a yard of solid navy blue Robert Kaufman Cambridge Cotton Lawn to go with it and made a heavily modified version of McCall's 7285, which I made without modifications last spring/early summer.
This time, I shortened the sleeves significantly and made extensive changes to the back:
I split the back pattern piece horizontally about halfway down the armscye, and cut 2 of the yoke piece on the fold, so I could do a double-layer yoke construction with all of the yoke seam allowances enclosed. I cut the main back piece on the fold, too, and but put the center back line about 2" away from the fold, adding several inches of space in the back. I added some notches on the yoke and main back piece, so I could keep track of where I wanted the gathers to bunch in the center. Then, because I no longer had a button in the back, I finished the neckline with a narrow bias facing. I cut a 10' square and turned it into continuous bias tape using instructions from an old quilt book, and then applied the bias facing using this Craftsy tutorial.
In general, I'm much happier with this version than I am with the first. The sleeves are more comfortable at the shorter length, and I can move more easily (although I still think the fit in the upper back could be better, as evidenced by the drag lines toward my armpits in the photo of the back of the shirt). Most importantly, though, it doesn't have a button at the back neck! The neckline is wide enough to go over my head comfortably, and I've found that the button on the first version catches in my braid in a terrible way, so I can't wear that shirt on days when I want to braid my hair.
I've already started making a third version of this shirt, in a lovely floral Liberty lawn. It's a long-sleeved version, with pintucks down the front. The only fit change I'm attempting from this one to that one is to try to eliminate a little bit of gaping at the front neckline. I'm excited to see how it fits when it's done!
Monday, October 23, 2017
Knitted Dishcloths
I made two more knitted dish cloths for our kitchen last summer. The one on the left is a grandmother's favorite, and the one on the right is something I made up - it's a couple rows of garter stitch alternating with a row of p1, *yo, p2tog* across. That one is our favorite of all our handknitted dishcloths so far, because it has the scrubby garter ridges AND lots of holes, so it dries quickly.
I'm planning to knit lots more of these - I recently ordered 17 balls of dishcloth cotton yarn from KnitPicks! The plan is to make a bunch to keep and a bunch to give as stocking stuffers at Christmas.
Tuesday, August 15, 2017
Little Polo Shirts
My nephew and grandcousin (first cousin once removed) have birthdays two weeks apart, and they turned two at the beginning of the summer. By luck, we were visiting my family in Europe for my grandcousin's birthday, and we were able to attend his birthday party.
I made two identical little polo shirts for little boy second birthday gifts. They're size 2T Oliver + S Parachute Polos. They went together pretty smoothly and I was happy with how they turned out, but I don't quite like this pattern as much as I like the Sketchbook Shirt. Part of it was that I fought with my machine hemming the knits. I ended up using a twin needle on the sleeve hems and a triple stretch stitch on the shirt hems, and wasn't 100% happy with either one.
I also think the inside of the side vent could be a little cleaner.
I did like how the inside of the collar and plackets looked, though.
Thursday, July 27, 2017
A shirt for me!
In service of my goal to make some shirts for myself, I tried out a woven t-shirt pattern: McCall's M7285. I made it out of a quilting cotton I got at the Hancock's going out of business sale last summer, and I'm thinking of it as a nice wearable muslin. I was able to cut this and the Roller Skate dress I made for my cousin's daughter out of a 2-yard cut of fabric.
I measured the bust of an old sleeveless blouse with a similar fit and closure and then cut a straight size 10 using the A/B cup front pattern piece. It's a little snug in the hips, even though I narrowed the seam allowances by 1/4" at the bottom of each side. The back is also a little tight across the shoulders.
The bust darts are in the right place, but as you can see in the next picture, after I lift my arms I get a fold of fabric stuck above my bust. I'm not sure whether that has to do with the non-drapiness of the quilting cotton, or because I made a size that is too small, or what.
It's not very visible in the pictures, but I'm also getting a little bit of gaping at the front neckline.
Even though it's not perfect, I'm planning to make at least two more of these, and I have some ideas for what I'm going to change:
- lowering the front neckline by about an inch and eliminating the button closure at the back neck. I don't need the button to get this one over my head, and when I wear my hair in a braid it gets knotted around the button, which is no fun.
- adding a back yoke. I'll make the seam between the yoke and the back piece about half-way down the armscyes, and put some gathers in the center of the back piece. This should give me some extra room at the back shoulders, so I can move more easily. I'm also hoping it will fix the fabric getting stuck above my bust problem. I'll cut both the back and back yoke pieces on the fold.
- shortening the sleeves by at least two inches.
I'm excited for the next version, but in the meantime I've been wearing this one a lot!
Subscribe to:
Posts (Atom)